Discovering hidden gem hiking trails near my current location: Forget crowded tourist traps! This isn’t your grandma’s nature walk – we’re talking secret waterfalls, breathtaking vistas only the locals know, and trails so secluded you might encounter a Sasquatch (don’t worry, we’ll provide bear spray recommendations). Prepare to ditch the well-trodden paths and embrace the untamed wilderness, one exhilarating step at a time.
We’ll guide you through the digital jungle, helping you unearth those hidden gems using technology, insider tips, and a healthy dose of adventurous spirit. Get ready to lace up those boots!
This journey will equip you with the tools to find your perfect trail, whether you’re a seasoned hiker seeking a challenging ascent or a casual rambler looking for a gentle stroll. We’ll cover everything from using technology to pinpoint your location and filter trails by difficulty and length to understanding how to decipher trail descriptions and access interactive maps. Safety is paramount, so we’ll also provide essential tips to ensure a safe and enjoyable experience in the great outdoors.
Understanding User Location & Preferences
Finding the perfect hidden gem hiking trail requires knowing where you are and what kind of adventure you’re craving. This involves cleverly combining technology with user input to deliver a truly personalized experience, transforming a simple search into a thrilling quest for the ideal path.Determining a user’s location is surprisingly multifaceted, involving a delicate dance between accuracy and user privacy.
We’ll explore the most common methods and their implications.
Location Determination Methods
Several technologies can pinpoint a user’s location, each with its own strengths and weaknesses. The most accurate method is GPS (Global Positioning System), which uses signals from satellites to determine latitude and longitude coordinates. However, GPS requires a clear view of the sky and can be less accurate in dense forests or urban canyons. As an alternative, IP address geolocation can provide a rough estimate of location based on the user’s internet service provider.
Notice family-friendly hiking trails near me with shaded areas for recommendations and other broad suggestions.
This method is less precise than GPS, often only providing a city or region, but it’s a valuable fallback option when GPS is unavailable. Finally, many modern devices also use Wi-Fi triangulation, which uses the signals from nearby Wi-Fi networks to estimate the user’s position. This technique offers a compromise between accuracy and reliance on satellite signals.
For example, a hiker in a remote area might rely on GPS initially, but if they lose signal in a dense forest, the app could switch to Wi-Fi triangulation if available, or resort to IP address geolocation as a last resort, providing a less precise but still helpful location estimate.
Hiking Difficulty Level Selection
To cater to diverse fitness levels, a simple dropdown menu would allow users to select their preferred hiking difficulty. The options would be: Easy, Moderate, and Strenuous. This simple interface element ensures users can easily filter trails based on their capabilities. For example, a user selecting “Easy” will only see trails described as easy hikes, avoiding potentially overwhelming or dangerous options.
Trail Length Range Input
Users should be able to specify their preferred trail length. We could achieve this using a range slider with pre-defined categories. The slider would allow users to select a range from Short (e.g., under 5km), Medium (e.g., 5-10km), and Long (e.g., over 10km). This interactive element allows for fine-grained control over the trail length, allowing users to select the perfect length for their hiking plans.
A user planning a short afternoon hike could easily select the “Short” range, while someone aiming for a full-day adventure could opt for the “Long” range.
Trail Type Preferences, Discovering hidden gem hiking trails near my current location
To further refine the search, users should be able to specify their preferred trail type. This could be implemented using a series of checkboxes. Options could include: Forest, Mountain, Coastal, Desert, and Urban. The system would then filter the results to show only trails matching the selected types. For instance, a user interested in a scenic coastal hike would only see trails with “Coastal” selected, ignoring forest trails or mountain trails.
This ensures that the user is only presented with trails that match their specific preferences, increasing the likelihood of a satisfying hiking experience.
Identifying Hidden Gem Hiking Trails: Discovering Hidden Gem Hiking Trails Near My Current Location
Unearthing those secret, seldom-trodden paths—the hiking equivalent of discovering a lost city of gold (minus the questionable religious practices and potential sacrifices)—requires a bit more than just pointing your finger at a map and hoping for the best. It’s a quest for the truly adventurous, a treasure hunt for tired feet and thirsty souls. Let’s embark on this digital expedition together.
Finding hidden hiking trails involves a clever blend of online sleuthing, digital intuition, and a healthy dose of skepticism (because sometimes, that “hidden gem” is just a really overgrown path to nowhere). The key is to look beyond the obvious, to delve into the digital undergrowth and uncover the secrets the mainstream hiking guides miss.
Data Sources for Discovering Lesser-Known Hiking Trails
The internet, that vast and sometimes bewildering wilderness, holds the key to unlocking countless hidden trails. We need to employ the right tools to sift through the digital detritus and find those sparkling gems.
- Local Hiking Blogs: Often run by passionate hikers, these blogs frequently detail lesser-known trails, offering insider tips and tricks. Think of them as your digital hiking buddies, whispering secrets only they know.
- Online Forums and Communities (Reddit, Hiking-Specific Forums): These are treasure troves of information, brimming with hikers sharing their experiences, both good and bad. You’ll find discussions on hidden trails, reviews of lesser-known areas, and even warnings about unexpected obstacles (like rogue squirrels guarding particularly scenic vistas).
- Social Media Groups (Facebook, Instagram): Search for local hiking groups. People often share photos and details of their adventures on less-popular trails, revealing hidden gems in the process. Just be wary of the occasional overly-enthusiastic filter.
- Local Libraries and Bookstores: Don’t underestimate the power of the physical world! Local libraries and bookstores often carry books and maps showcasing regional hiking trails, some of which may be off the beaten path.
Filtering Out Popular Trails
Once you’ve amassed a list of potential trails, the next step is to separate the wheat from the chaff—the hidden gems from the well-worn paths. This requires a bit of detective work.
One effective method involves cross-referencing your findings with popular hiking websites and apps. If a trail isn’t listed on AllTrails, Hiking Project, or similar platforms, or if it has very few reviews, it’s a strong indication that it might be a less-traveled path. Look for trails with minimal photos or limited online presence—those are often your best bets for solitude and adventure.
Algorithms for Ranking Hiking Trails
Ranking trails requires a multifaceted approach, going beyond simple popularity metrics. A robust algorithm would consider various factors to provide a truly representative ranking.
A simple approach might use a weighted average: For example, you could assign weights to factors like scenic views (30%), difficulty (30%), length (20%), and user reviews (20%). A trail with stunning views, moderate difficulty, a reasonable length, and positive reviews would rank higher than a trail with only one of these attributes. More sophisticated algorithms could incorporate machine learning to predict user preferences based on past trail choices and reviews.
For instance, if a user consistently rates trails with high scenic views and low difficulty, the algorithm can prioritize trails matching those preferences.
Hiking Trail Database Schema
Organizing your findings requires a well-structured database. Here’s a suggested schema:
| Column Name | Data Type | Description |
|---|---|---|
| TrailName | VARCHAR(255) | Name of the hiking trail |
| Location | VARCHAR(255) | Geographic location (city, state, etc.) |
| Difficulty | ENUM(‘Easy’, ‘Moderate’, ‘Difficult’, ‘Strenuous’) | Level of difficulty |
| Length | FLOAT | Length of the trail in miles |
| ElevationGain | INT | Total elevation gain in feet |
| UserReviews | TEXT | User reviews and ratings |
| Latitude | FLOAT | Latitude coordinate |
| Longitude | FLOAT | Longitude coordinate |
Presenting Trail Information Effectively
Serving up trail details isn’t just about spitting out facts; it’s about painting a picture that makes hikers want to lace up their boots and hit the trail. We need to present information in a clear, concise, and visually appealing way, transforming a simple list of facts into an enticing adventure invitation. Think less spreadsheet, more travel brochure!
This section details how we’ll craft compelling trail information, from clever table design to user-generated content integration, making our hidden gem recommendations truly shine.
Trail Information Table
A well-structured table is crucial for presenting key trail data at a glance. Below is an example of a responsive table designed for clarity and easy readability across different screen sizes. We’ve opted for four columns to keep things concise, yet informative.
| Trail Name | Distance (miles) | Difficulty | Estimated Time |
|---|---|---|---|
| Whispering Pines Trail | 3.5 | 1-2 hours | |
| Rocky Ridge Ramble | 6.2 | 3-4 hours | |
| Summit Scramble | 8.0 | 5-7 hours | |
| Hidden Falls Hike | 2.1 | 1 hour |
Note: The images represented by “easy_icon.png”, “medium_icon.png”, and “hard_icon.png” would be color-coded icons. For example, “easy_icon.png” might display a green leaf, “medium_icon.png” a yellow sun, and “hard_icon.png” a red mountain peak. This visual cue immediately communicates the trail’s difficulty.
Descriptive Trail Text
Dry facts are boring. We need to evoke the trail’s essence through vivid descriptions. Consider these examples:
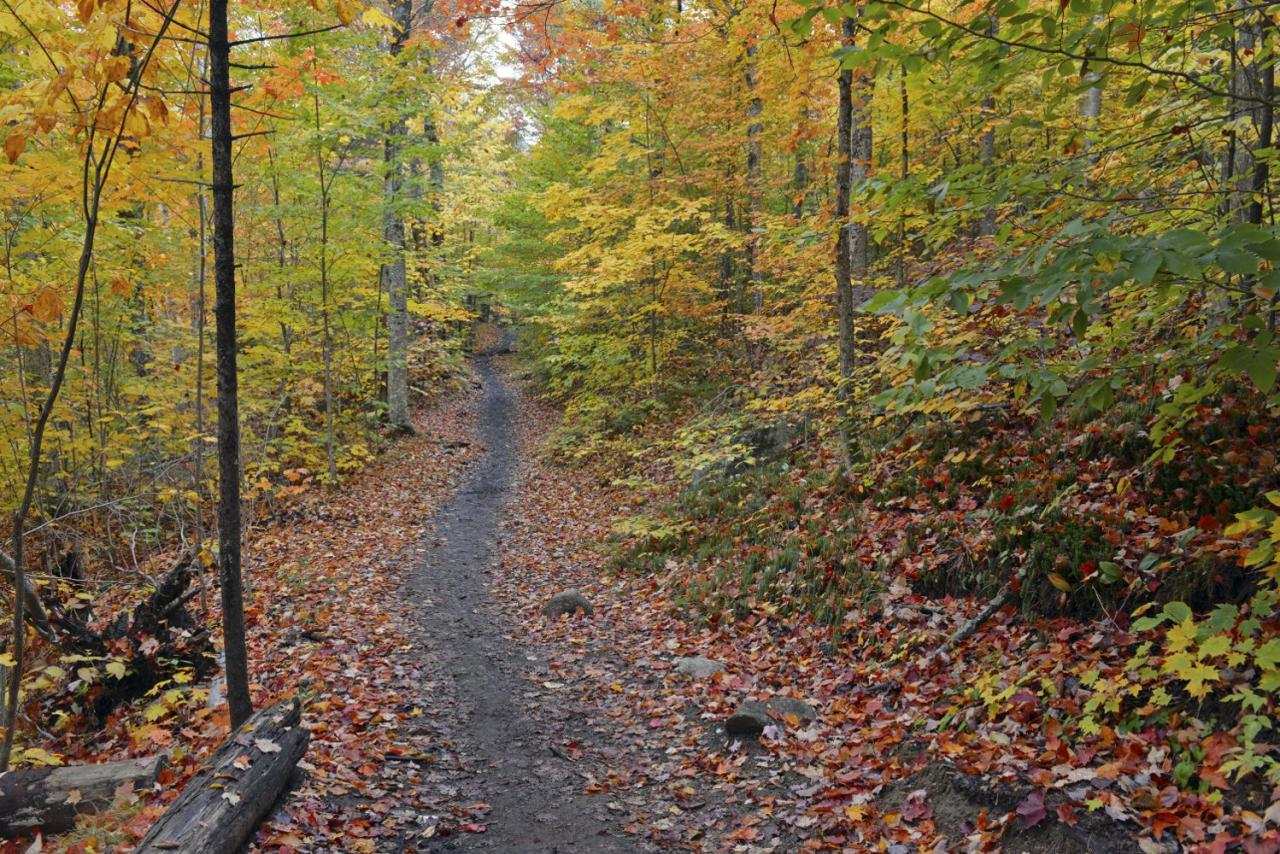
Whispering Pines Trail: A gentle stroll through a fragrant pine forest, perfect for a relaxing afternoon hike. Keep an eye out for playful squirrels and the occasional glimpse of deer. The trail culminates at a serene overlook offering breathtaking views of the valley below.
Rocky Ridge Ramble: This moderately challenging trail rewards hikers with panoramic vistas from its rocky summit. Prepare for some steep inclines and uneven terrain, but the stunning scenery makes it all worthwhile. Experienced hikers will find this a delightful challenge.
Summit Scramble: This strenuous hike is not for the faint of heart! Expect challenging climbs, rocky sections, and potentially some scrambling. However, the unparalleled views from the summit are an unforgettable reward for your efforts. Only experienced hikers with proper gear should attempt this trail.
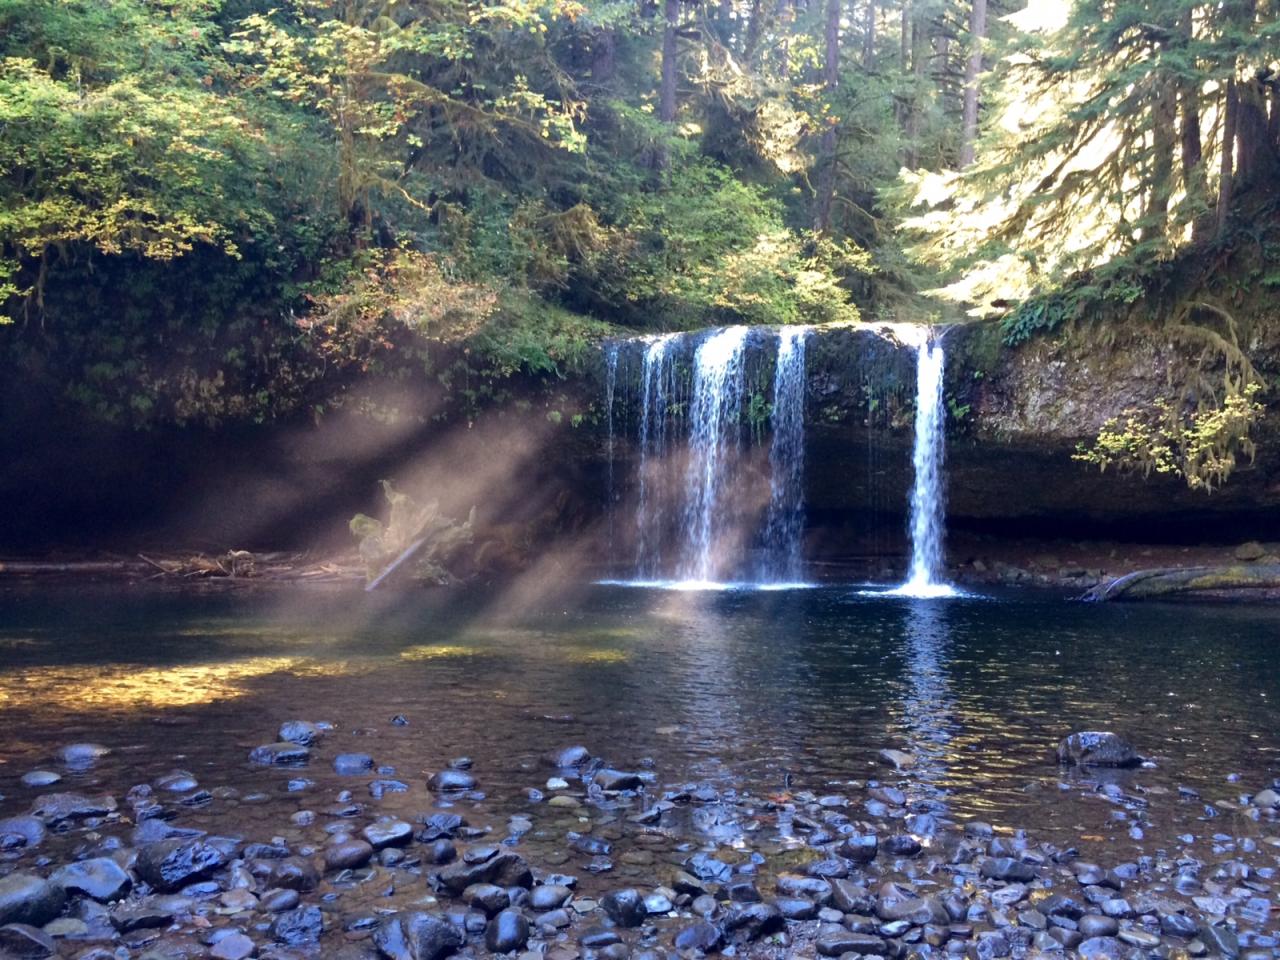
Hidden Falls Hike: A short but rewarding hike leading to a beautiful, secluded waterfall. The trail is easy to follow and suitable for all fitness levels, making it a great option for families and beginners. The refreshing spray of the falls makes for a perfect picnic spot.
User-Submitted Photos and Reviews
To enhance the authenticity and engagement of our trail information, we’ll incorporate a system for users to submit photos and reviews. This user-generated content adds a personal touch, enriching the experience for future hikers. Each trail page will feature a dedicated section for displaying photos and reviews, sorted by date or rating. We could even implement a rating system (e.g., 1-5 stars) to help other users assess the trail’s suitability.
Imagine a vibrant gallery of user-submitted photos showcasing the breathtaking scenery, alongside honest reviews sharing hikers’ experiences, tips, and warnings. This dynamic, community-driven approach transforms our platform into a collaborative resource for outdoor enthusiasts.
Generating Interactive Trail Maps

Unleashing the power of interactive maps transforms a simple hiking trail description into a vibrant, explorable adventure. Forget static images; we’re talking dynamic, data-rich maps that bring the trail to life, complete with elevation profiles that’ll make even the most seasoned hiker gasp (or maybe just gently nod in appreciation). This is where your virtual hiking boots get their real workout.Interactive maps are the secret weapon for showcasing hidden gem trails.
They provide hikers with the information they need to plan their adventure with confidence, avoiding unexpected surprises (like a sudden, unexpected 1000-foot climb). By visually presenting the trail’s route, elevation changes, and points of interest, you’ll attract more adventurous souls to the trails you’re highlighting.
Integrating Map Data from OpenStreetMap or Google Maps
Several platforms offer map data suitable for creating interactive trail maps. OpenStreetMap (OSM), a collaborative project creating a free, editable map of the world, is a fantastic resource for detailed trail data, especially in areas where Google Maps might be less comprehensive. Google Maps, on the other hand, boasts a user-friendly interface and extensive coverage. The choice often depends on the specific trail’s location and the level of detail required.
Integrating this data typically involves using a mapping library (like Leaflet or Mapbox GL JS) that allows you to easily pull in the map tiles and work with the geographical data. This process involves obtaining API keys (for Google Maps) or simply accessing the OSM tile servers, depending on your chosen platform. For example, with Leaflet, you’d use code to specify the tile layer (e.g., `L.tileLayer(‘https://s.tile.openstreetmap.org/z/x/y.png’, …
)`), effectively rendering the map on your webpage.
Creating Map Markers for Key Locations
Once the base map is displayed, the fun begins! We need to pinpoint key locations along the trail using map markers. These markers, typically small icons, indicate trailheads, viewpoints, water sources, campsites, or any other relevant points of interest. Each marker can be customized with an icon representing its function and can include a pop-up window that displays additional information when clicked.
For instance, a water source marker could include details about the water’s potability and distance to the next water source. Creating these markers involves using the mapping library’s marker functionality; for example, in Leaflet, you would create a marker using `L.marker([latitude, longitude]).addTo(map);` and then add a popup with the details. Imagine a hiker seeing a marker for a stunning vista and clicking it to read “Breathtaking panoramic views of the valley, perfect for sunset photos!”
that’s the magic of interactive maps.
Displaying a Trail’s Elevation Profile
To truly capture the essence of a hiking trail, you need to display its elevation profile. This is where a line graph comes in handy. The graph plots elevation on the y-axis against distance on the x-axis, providing a visual representation of the trail’s ups and downs. This is crucial for hikers to understand the difficulty of the trail and plan accordingly.
Find out about how best hiking trails near me for sunset views can deliver the best answers for your issues.
Generating this graph requires elevation data, which can often be extracted from OSM data or obtained through other elevation services. Many charting libraries (like Chart.js or D3.js) can easily create these graphs from the data. For example, you might use Chart.js to create a line chart showing the elevation changes along the trail, making it easy for hikers to see the steep climbs and gentle descents.
A sample dataset might look like this: `[ distance: 0, elevation: 1000 , distance: 1, elevation: 1100 , distance: 2, elevation: 1050 , … ]`. The graph would then visually represent this data, allowing hikers to assess the trail’s difficulty at a glance.
Safety and Practical Considerations
Embarking on a hidden gem hiking trail is an adventure, but a little preparation can transform a thrilling experience into a truly unforgettable one. Ignoring safety precautions can quickly turn a scenic stroll into a survival story, so let’s equip you with the knowledge to conquer those trails confidently and return home with amazing photos (and all your toes).
Remember, the beauty of these hidden trails often comes with a bit more ruggedness. While the thrill of discovery is intoxicating, prioritizing safety is paramount. This section will cover essential safety tips, trail condition updates, environmental responsibility, and a system for reporting any issues you might encounter along the way.
Essential Hiking Gear
Proper gear isn’t just about looking the part; it’s about your comfort and safety. Think of it as your hiking armor. A well-packed backpack is your best friend, protecting you from the elements and unexpected situations.
- Sturdy Hiking Boots: Broken ankles are no fun. Invest in comfortable, well-broken-in boots with good ankle support.
- Layers of Clothing: Weather in the mountains can change faster than a chameleon’s mood. Pack layers to adapt to fluctuating temperatures.
- Navigation Tools: A map, compass, and GPS device (with charged batteries!) are essential, even if you’re using a phone app. Cell service can be spotty in remote areas.
- First-Aid Kit: Prepare for minor injuries with bandages, antiseptic wipes, pain relievers, and blister treatment.
- Water and Snacks: Dehydration and low blood sugar can quickly sap your energy. Pack plenty of water and high-energy snacks.
- Headlamp or Flashlight: Even a short hike can extend into evening hours, especially if you get sidetracked by stunning views (which you will!).
- Sunscreen and Insect Repellent: Protect your skin from the sun and pesky insects.
Weather Preparedness and Emergency Procedures
Mother Nature can be unpredictable. Checking the forecast before you go is crucial, but even a sunny forecast can turn sour quickly. Understanding how to react to changing conditions is vital.
- Check the forecast meticulously: Don’t just glance at it; look for specifics about temperature, precipitation, and wind conditions.
- Be prepared for sudden changes: Even on a clear day, mountain weather can shift dramatically. Have a plan B if conditions worsen.
- Know the signs of altitude sickness: If you’re hiking at high elevations, be aware of the symptoms of altitude sickness and take precautions.
- Have a communication plan: Inform someone of your hiking plans, including your route and expected return time. This is especially crucial for solo hikers.
- Carry a whistle: A loud whistle can help you signal for help if you’re injured or lost.
- Know basic first aid and survival techniques: A wilderness first-aid course is an excellent investment for serious hikers.
Trail Conditions and Potential Hazards
Knowing what to expect on the trail can make all the difference. Trail conditions can change rapidly due to weather, erosion, or even wildlife activity. Staying informed is key to a safe and enjoyable hike.
- Check for recent trail closures or advisories: Many parks and trail organizations maintain websites or social media pages with up-to-date information.
- Be aware of potential hazards: This might include steep drop-offs, slippery rocks, wildlife encounters (bears, snakes, etc.), or even flash floods during heavy rains.
- Watch for trail markers and signage: These are there for a reason; pay attention to them.
- Assess trail difficulty honestly: Don’t overestimate your abilities. Choose trails that match your fitness level and experience.
Leave No Trace Principles
Leaving no trace isn’t just a polite suggestion; it’s essential for preserving the beauty of these hidden gems for future generations. It’s about minimizing your impact on the environment and ensuring everyone can enjoy these spaces.
- Pack out everything you pack in: This includes trash, food scraps, and even toilet paper.
- Stay on marked trails: Avoid creating new trails or shortcuts, which can damage vegetation and wildlife habitats.
- Respect wildlife: Observe animals from a distance and never feed them.
- Minimize campfire impacts: If campfires are allowed, use existing fire rings and ensure they are completely extinguished before leaving.
- Be considerate of other hikers: Yield to uphill hikers and be mindful of noise levels.
Trail Condition Reporting System
We need your help to keep our trail information accurate and up-to-date! This system will allow you to report any trail issues you encounter, helping other hikers stay safe and informed.
Our system will use a simple online form. You’ll be able to specify the trail, the type of issue (e.g., trail closure, hazard, erosion), and provide a brief description. You can also include photos if you have them. This information will be reviewed and updated on our trail database. Think of it as a digital trail register, powered by your keen eyes and sense of adventure!
Summary
So, there you have it – your passport to uncovering the hidden hiking paradises nestled near your doorstep. Armed with the knowledge and resources provided, you’re ready to embark on countless adventures, leaving behind the well-worn paths and discovering the magic that awaits just beyond the ordinary. Remember, the best adventures often lie off the beaten track. Happy hiking!